Introduction

Welcome to the UAV Logbook documentation. This guide is designed to assist you in navigating through the various features and functionalities of UAV Logbook. Whether you are a new user looking to get started or an experienced user seeking advanced tips, this documentation will provide you with the necessary information to effectively utilize the software. From installation instructions to detailed usage guidelines and troubleshooting tips, we aim to ensure that you have a seamless experience with UAV Logbook. Let's embark on this journey to make your UAV operations more efficient and organized.

Getting Started

Downloading/Unzipping UAV Logbook

  1. Download the latest release from here.
  2. Extract the contents of the .zip file to your preferred location. The application will run contained in a single folder.
  3. Once extracted, the contents of your folder should look similar to this:
  4. Folder Structure

First Run

When you launch UAV Logbook for the first time, you will be greeted with the 'Settings' window, which will have default settings prepopulated. After reviewing and adjusting the settings as needed, click 'Save' or 'Close' to proceed.

Initial Settings 1 Initial Settings 2 Initial Settings 3


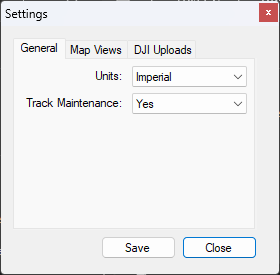
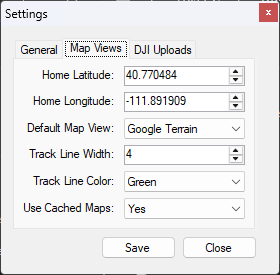
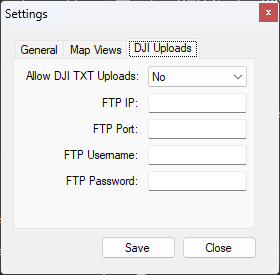
The 'Settings' window will appear only if the application cannot find the database file or you have not clicked the 'Save' button in the 'Settings' window.

For information regarding the 'FTP...' fields, refer to the 'DJI FlighRecord Parsing' section.

After closing the 'Settings' window, you will see setup windows for your first drone, battery, and location.

Initial Drone Setup Initial Battery Setup Initial Location Setup


While these setup windows can be closed without impacting the application's usability, it is essential to add these items before you can add or import any flights.

Although not completely necessary, you should try to give your drones, batteries, and locations unique names to avoid confusion.

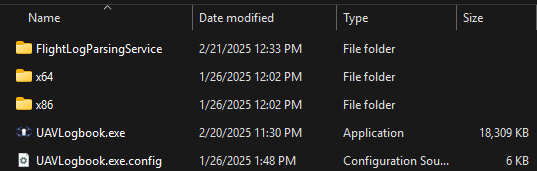
Upon closing the 'Add Location' window, you will notice that the 'uavlogbook.db' file and an 'Imported' folder have appeared in the same folder as the the application.

The 'uavlogbook.db' file is the database file that contains all of your data. It is recommended to back up this file regularly to prevent data loss.

The 'Imported' folder is where the .csv and .txt files are placed after they are imported into the application.

After completing the initial setup, you are now ready to start using UAV Logbook. You can add/import flights, view statistics, and manage your drone operations efficiently.

Main Window


For more detailed instructions on how to use the application, please refer to the 'How To...' section.

How To...

Add A Drone

  1. Click on the 'Drones' tab on the right side of the main window.
  2. Click on the 'Add' button near the bottom of that section.
  3. Add Drone


  4. Fill in the required fields such as name, manufacturer, and serial number (optional).
  5. Click on the 'Add' button to add the drone to your list.
  6. Add Drone

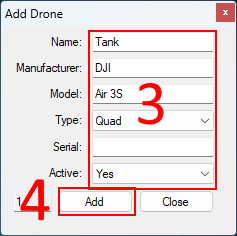
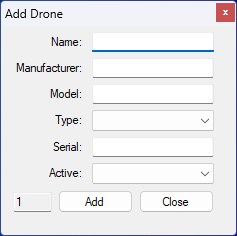
    Make sure to give your drone a unique name to avoid confusion.

    A serial number is not required. However, if you don't add one, imports will require an extra manual step to select the drone from a list.

  7. Continue looping through steps 1-4 for each drone in your fleet. Once you are done adding the last drone, click on the 'Close' button.
  8. Add Drone

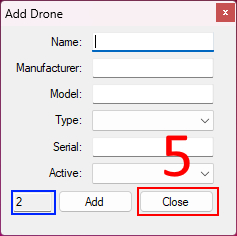
    Notice that for each drone, the ID in the bottom left corner will increment.

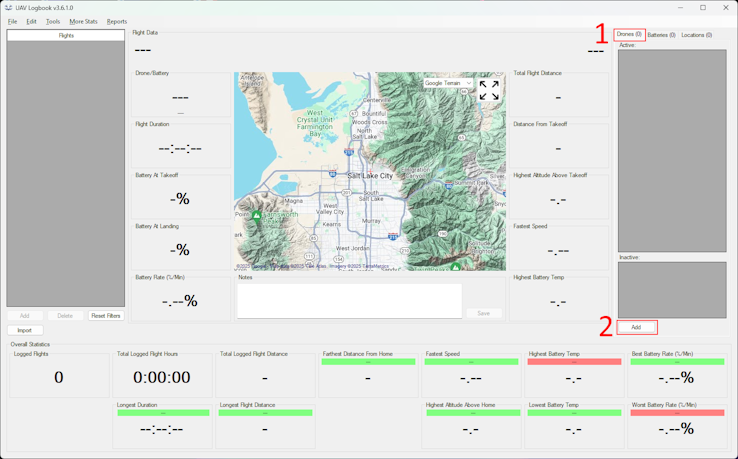
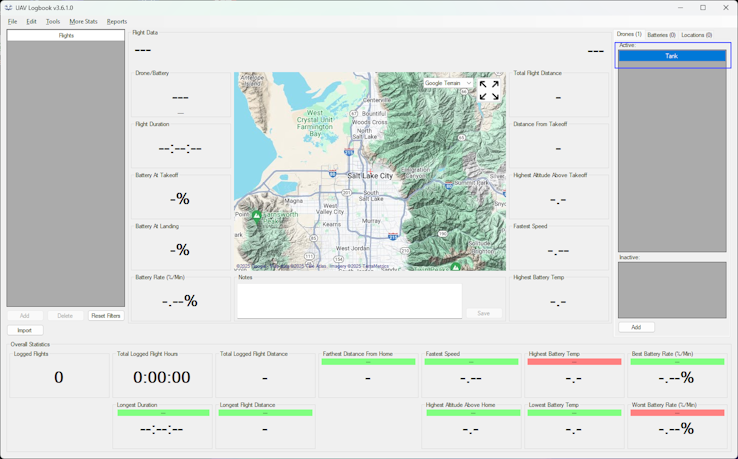
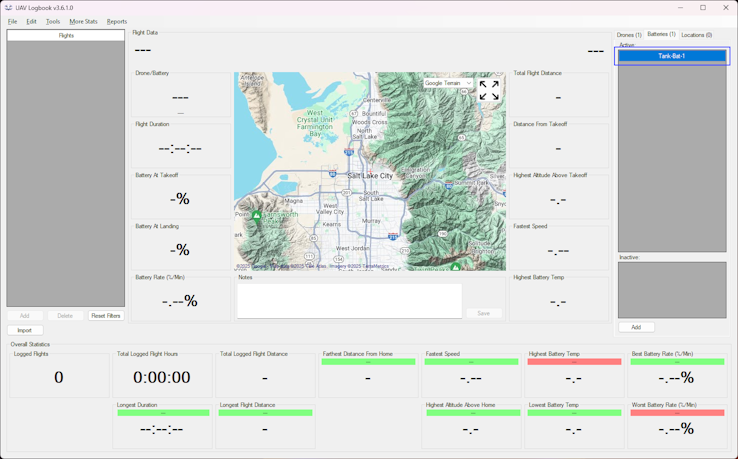
Upon closing the 'Add Drone' window, you will see your new drone(s) show up in the 'Active' list in the main window.

Drone Added

Add A Battery

  1. Click on the 'Battery' tab on the right side of the main window.
  2. Click on the 'Add' button near the bottom of that section.
  3. Add Battery


  4. Fill in the required fields such as name, manufacturer, and associated drone.
  5. Click on the 'Add' button to add the battery to your list.
  6. Add Battery

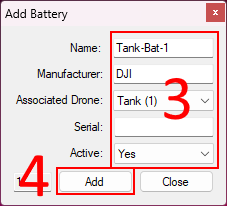
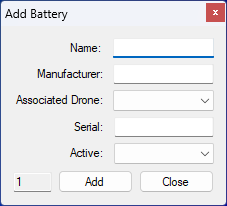
    Make sure to give your battery a unique name to avoid confusion.

    A serial number is not required. However, if you don't add one, imports will require an extra manual step to select the battery from a list.

  7. Continue looping through steps 1-4 for each battery in your inventory. Once you are done adding the last battery, click on the 'Close' button.
  8. Add Battery

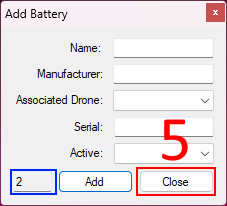
    Notice that for each battery, the ID in the bottom left corner will increment.

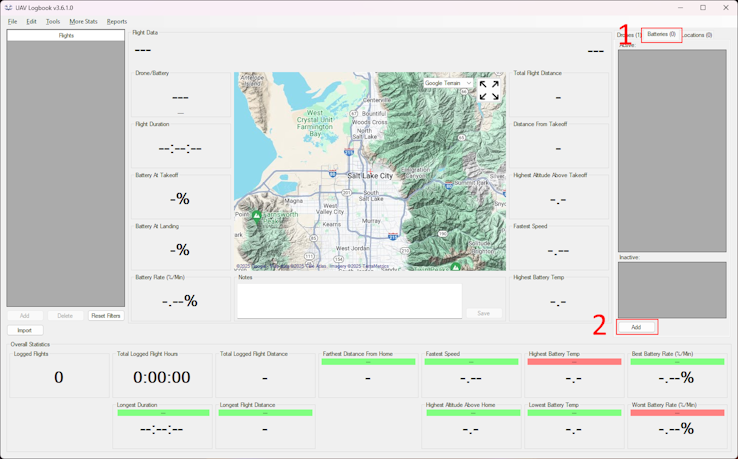
Upon closing the 'Add Battery' window, you will see your new battery(ies) show up in the 'Active' list in the main window.

Battery Added

Add A Location

  1. Click on the 'Locations' tab on the right side of the main window.
  2. Click on the 'Add' button near the bottom of that section.
  3. Add Location


  4. Fill in the required fields for name and coordinates.
  5. Click on the 'Add' button to add the location to your list.
  6. Add Location

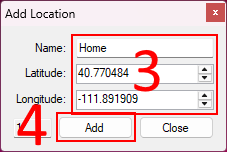
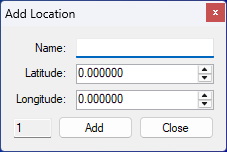
    Make sure to give your location a unique name to avoid confusion.

  7. Continue looping through steps 1-4 for each location. Once you are done adding the last location, click on the 'Close' button.
  8. Add Location

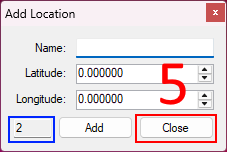
    Notice that for each location, the ID in the bottom left corner will increment.

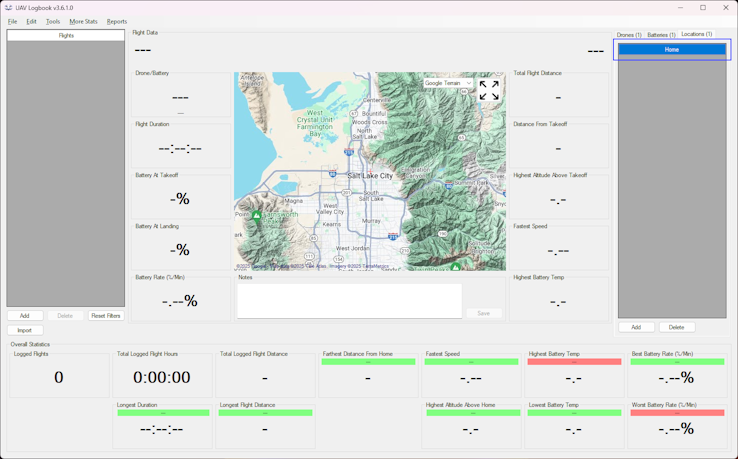
Upon closing the 'Add Location' window, you will see your new location(s) show up in the list in the main window.

Location Added

Add A Flight

  1. Click on the 'Add' button below the 'Flights' list on the left of the main window.
  2. Add Flight

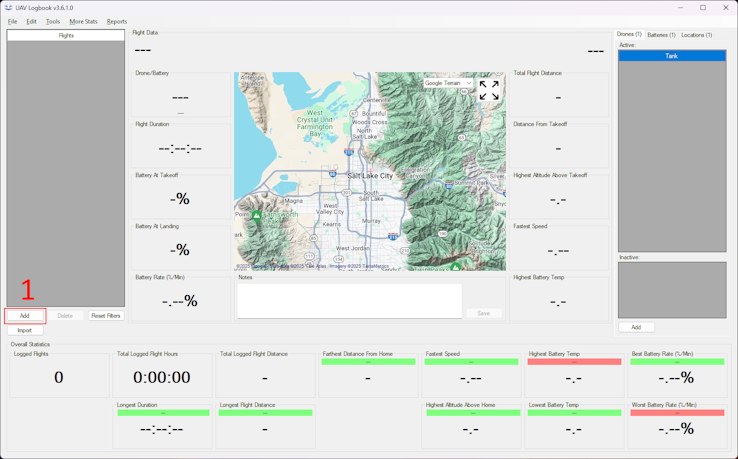
    The 'Add' button will only be enabled if there is at least 1 each of drones, batteries, and locations in your inventory.

  3. Fill in the required all fields. Notes are optional.
  4. Click on the 'Add' button to add the flight to your logbook.
  5. Add Flight


  6. Continue looping through steps 1-3 for each flight. Once you are done adding the last flight, click on the 'Close' button.
  7. Add Flight

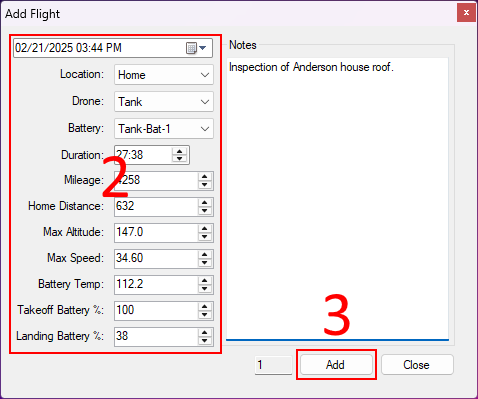
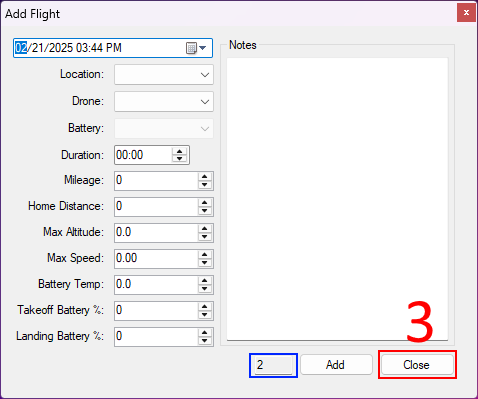
    Notice that for each flight, the ID in the bottom left corner will increment.

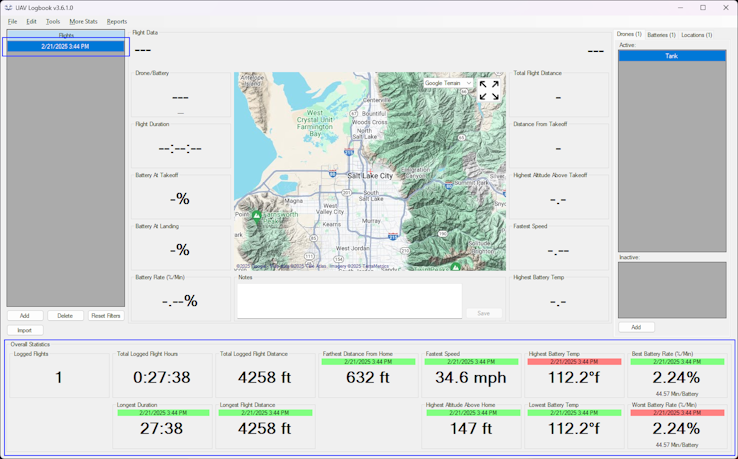
Upon closing the 'Add Flight' window, you will see your new flight(s) show up in the 'Flights' list in the main window. You will also notice that the 'Overall Statistics' section at the bottom of the window has been updated with the new statistics.

Flight Added

Import A Flight

WIP

DJI FlightRecord Parsing

Requirements

Setup Docker Desktop

  1. Download and install Docker Desktop from here.
  2. Open Docker Desktop and ensure it is running.

Get A DJI Develper API Key

  1. Go to the DJI Developer Portal.
  2. Sign up for an account or log in if you already have one.
  3. Once you are signed in, Click 'Create App' in the top right corner.
  4. Under 'App Type', select 'Open API'.
  5. Fill out the rest of the form and hit 'Create'.
  6. Check your email for an activation link.
  7. Once you click the activation link in your email, open the app information page by clicking on the app you just made in your Dev dashboard.
  8. Copy the App Key that is listed there.

Download The FlightRecordParsingLib Files

  1. Go to the FlightRecordParsingLib GitHub page.
  2. Click the green 'Code' button at the top of the page.
  3. At the bottom of the popup window, click 'Download ZIP'.
  4. Unzip the downloaded .zip archive to "C:\DJI".

Setup The FlightRecordParsingLib Docker Container

  1. In a command prompt, type "cd C:\DJI" and press 'Enter'..
  2. Once in the 'C:\DJI' folder, type "docker build --build-arg SDK_KEY=[Your_App_Key] -t pf ."
  3. Replace [Your_App_Key] with the key you found in step 8 of the Get A DJI Develper API Key process.

    Do not forget the . at the end.

Setup The FTP Server

  1. Download and install FileZilla Server from here.
  2. Be sure to include the "Administration interface". with the installation.

    It is also a good idea to select the option to have the server install as a service.

  3. Once the installer finishes, the Administration interface should open. If not, open it from the Start Menu or desktop shortcut.
  4. In the Administration interface, click on the 'Connect to Server...' button.
  5. The "Connection" window, the 'Host:' and 'Port:' fields should automatically fill. Enter the password that you set during the installation process and click on the 'OK' button.
  6. If you see a "Do you trust this server?' window, click on the 'Yes' button.
  7. Once the 'Settings...' window opens, click on the 'Users' item in the left pane.
  8. Below the list of users, click on the 'Add' button and type a username.
  9. Above the 'Member of groups:' field, type a password.
  10. Keep note of the username and password set here.

  11. Below the 'Mount points:' section, click on the 'Add' button.
  12. In the 'Virtual path' field, type "/".
  13. In the 'Native path' field, type a valid path such as "C:\DJI\FlightRecordParsing".
  14. Click on the 'Apply' button and close the FileZilla windows.

Final Setup of FlightRecordParsing

  1. Create the folder you entered in step 11 of the FileZilla Server setup process.
  2. Create a folder named 'Processing' inside the folder mentioned in step 1.
  3. Navigate to the folder where the UAVLogbook.exe file is located.
  4. In a command prompt, type "cd [Location_of_UAVLogbook.exe]\FlightLogParsingService".
  5. Replace [Location_of_UAVLogbook.exe] with the path to the folder where the UAVLogbook.exe file is located.

  6. Once in the 'FlightLogParsingService' folder, type "FlightLogParsingService.exe [Folder_created_in_step_11_of_FTP_Server_Setup]".
  7. For convenience, you can use nssm to run the FlightLogParsingService as a Windows service.

Update FTP Settings in UAV Logbook

  1. In UAV Logbook, click on 'File' and then 'Settings'.
  2. In the 'Settings' window, click on the 'DJI Parsing' tab.
  3. Change the 'Allow DJI TXT Uploads:' option to 'Yes'.
  4. In the 'FTP IP:' field, enter the IP address of the computer running the FTP server and FlightLogParsingService. This will likely be "127.0.0.1" or "localhost".
  5. In the 'FTP Port:' field, enter the port number of the FTP server. Unless you set it manually, this will likely be "21".
  6. In the 'FTP Username:' field, enter the username you set in step 7 of the FTP server setup process.
  7. In the 'FTP Password:' field, enter the password you set in step 8 of the FTP server setup process.
  8. Click on the 'Save' button.

Troubleshooting

Common issues and their solutions.